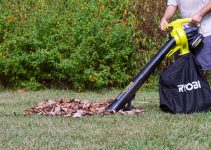
Now that the wife and I live in the sticks (okay, the city sticks… we’re like five minutes from a Target, but still… we’re in the woods and have turkey and deer as neighbors), we’ve got a ton of trees dropping all kinds of debris on the ground. Plus, for years, the previous owner had his lawn guy just keep stacking sticks, twigs, and leaves into what has now become several different large piles of unsightly messiness.
Sure, the county waste management agency will take just about any amount of yard debris placed at the curb each week, but burning is just what we do out here in the country, ya’ll. So, I’ve set out to find (or make) a burn barrel.
I’m not really interested in burning in an open pile because it’s just too messy. I need something contained and, hopefully, something I can move when not in use. There are also burn restrictions here, as there should be, so I have to take that into account.
Warning: There are quite a few states and/or municipalities that do now allow outdoor burning whatsoever. You can learn more online or by asking your local fire department. Also, burning plastic produces toxic dioxins—don't do it.
Table of Contents
The Burn Zone
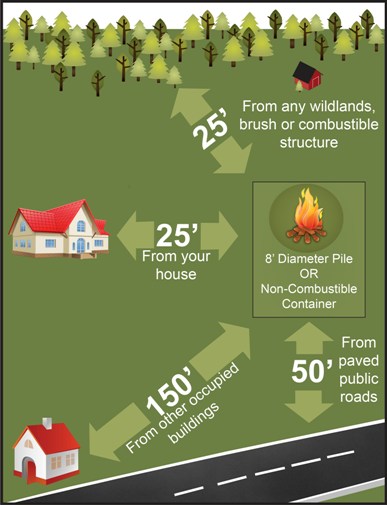
I’ll likely be clearing an area in the very back of the property to use as my burn zone. As much room as we seem to have on our property, there are a lot of trees and it does back up to wildlands, although there is a creek in between. Given Florida’s outdoor burning regulations (pictured below), I should be OK with the area I’ve designated as my burn zone. I think I’m going to make the area about 15′ x 15′, cover it with sand so I can just rake it clean, and create a border with some kind of decorative rock.
The 55-Gallon Drum Burn Barrel
With burn zone area basically figured out but obviously not built yet, I’ve got to chose an incinerator. After open pile burning, the second most common way to burn yard debris around here is in a 55-gallon drum. I know of at least a few places I could score an empty drum for free or at least cheap, so I could certainly modify one to use as a burn barrel.
Clearly, one end of the barrel will need to be opened, if it isn’t already. A [easyazon_link keywords=”reciprocating saw” locale=”US” tag=”garagespot05-20″]reciprocating saw[/easyazon_link] or similar will do the trick.
[amazon fields=”B00N5FLVM8″ value=”thumb” image_size=”large” image=”2″]
[amazon fields=”B00N5FLVM8″ value=”button”]
I also want a lid on mine. So, I’d have to make one out of [easyazon_link keywords=”expanded metal” locale=”US” tag=”garagespot05-20″]expanded metal[/easyazon_link] and then add some kind of extended handle to it so I don’t burn my pinky.
[amazon fields=”B00FY3Y54K” value=”thumb” image_size=”large” image=”2″]
[amazon fields=”B00FY3Y54K” value=”button”]
The barrel would also need to have proper ventilation, which would serve three purposes: to make burning more efficient, allow smaller ash to fall through to the ground, and to drain any rainwater that might get into the barrel when not in use or covered. Typically, this just involves drilling holes on and at the bottom of the barrel. Too many holes, however, will lessen the integrity of the barrel, causing it to eventually collapse on itself.
One way to put holes in a barrel is to use a drill. You could also use a larger center punch and a hammer. OR… you could do it the way Big Daddy does it…
Not my Daddy, but still a cool dude. Maybe.
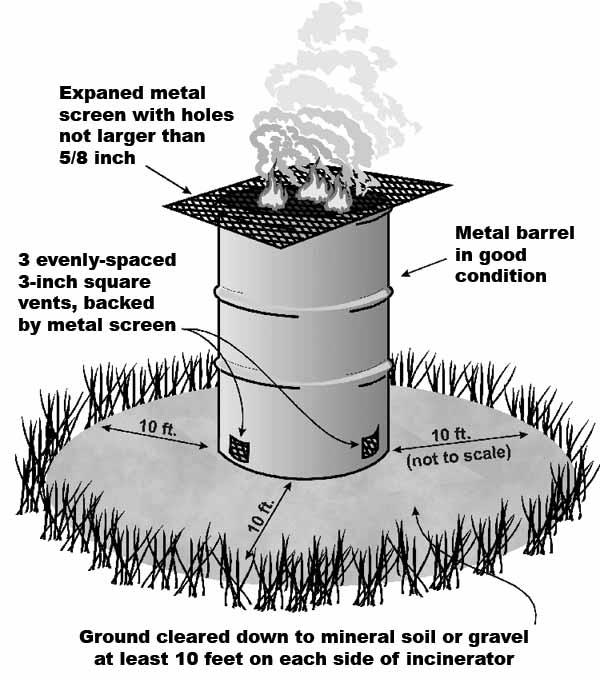
If I go the barrel route, I like the cleaner looking square vents, covered with metal screen. The diagram below is probably how I’d build my burn barrel, but I would want a cleaner looking lid—round with a handle. I’d also want to have holes in the bottom of the barrel and raise it off the ground using welded legs, cement blocks or something.
The Oscar Burn Can
Another option I actually think looks cool is what I call the
[easyazon_link identifier=”B00LJZ9QO6″ locale=”US” tag=”garagespot05-20″]Oscar Burn Can[/easyazon_link]from Behrens Manufacturing (older folks will get the reference). I like the retro look of this thing and it’s only $35 or so. It also has built-in legs, vents, and a lid. The reviews are solid but at just 20 gallons, it’s small—maybe too small for me.
[amazon fields=”B00LJZ9QO6″ value=”thumb” image_size=”large” image=”1″]
[amazon fields=”B00LJZ9QO6″ value=”button”]
Then again—unless we have another hurricane—I really only have to deal with the amount of debris I have right now once. After these piles are gone, I’ll be in maintenance mode. So, this is kinda still an option for me.
The Burn Cage
A much more expensive way to go is a [easyazon_link identifier=”B015MUEE6S” locale=”US” tag=”garagespot05-20″]heavy-duty burn cage[/easyazon_link], like this one from Professional Grade Products. These things are expensive—like $200-$400 expensive. The advantage with something like this design is that you get a cleaner burn with less clean-up/clean-out required. If I were to put that many holes in a 55-gallon drum, it would probably collapse pretty quickly.
[amazon fields=”B015MUEE6S” value=”thumb” image_size=”large” image=”1″]
[amazon fields=”B015MUEE6S” value=”button”]
What to Do??
At least for now, I’m pretty certain I’m going to go with the 55-gallon drum option. They’re cheap, I can design it to ventilate and [somewhat] self-clean, and they’re solid. I like the manufactured burn cages a lot and DR Power even has a burn cage that folds up when not in-use—something I really like. But, if I’m clearing an area of land just for this purpose—even it if ends up doubling as our fire pit/sitting area down by the creek—I may as well just have the thing sitting there in its designated space.
At some point in the near future, I’ll do a write-up on my 55-gallon burn barrel build. Right now, we’re just trying to get moved in, as we’re renovating all kinds of rooms and whatnot. More to come…

